Tutorial: Template Designer
From a blank LibreOffice document to an approved production template in 10 minutes.
# User-defined fields in LibreOffice (Ctrl+F2)

Field name:  customer.firstname  → "John"
Field name:  customer.lastname   → "Doe"
Field name:  customer.gender   → "MALE"
Field name:  customer.street     → "Example Street 1"
Field name:  customer.zip       → "62701"
Field name:  customer.city       → "Springfield"

✓ Template uploaded and validated
What you need
Docker Engine to run the Blocpress Studio — the all-in-one quickstart image
The Studio image ships with a built-in dev key — no IdP setup needed
Start the Blocpress Studio
Blocpress Studio is a single Docker image that bundles the Workbench, the Render API, and a PostgreSQL database — everything you need to get started without any configuration.
docker run -d -p 8080:8080 --name blocpress-studio flaechsig/blocpress-studio:latest
Once the container is running, open the Workbench in your browser:
http://localhost:8080
The Studio ships with a built-in dev JWT token for the
Render API (POST /api/render/{name}).
Download it here:
token.txt
Create a document in LibreOffice
Download the two sample files for this tutorial:
- letter.odt — the plain design document: layout, fonts, and static text, exactly as the finished PDF should look. Use this as your starting point when creating your own templates.
- letter_blocpress.odt — the ready-to-use template with all user-defined fields already inserted. Upload this file to the Workbench in step 3.
letter.odt,
replace the static placeholder text with user-defined fields (see step 2),
and save as a new ODT file. letter_blocpress.odt shows you
the finished result.
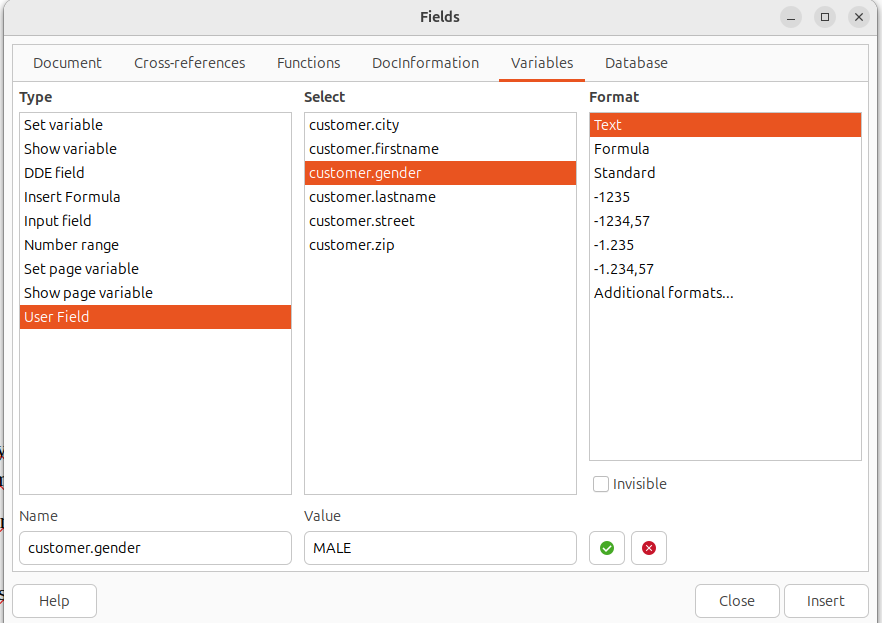
Insert fields (Ctrl+F2)
Wherever JSON data should appear in the document, insert a User-Defined Field:
- Place the cursor at the desired position
- Press Ctrl + F2
- In the dialog: select type "User-Defined"
- Enter a field name in dot notation matching the JSON path —
for example
customer.firstnameorcustomer.lastname - Click Insert
customer.firstname reads from
{ "customer": { "firstname": "..." } }.
Fields for the letter example
# Recipient fields
customer.firstname  → "Jane"
customer.lastname   → "Doe"
customer.street     → "123 Main Street"
customer.city       → "Springfield"
Conditional text (e.g. salutation)
To vary text inline based on a data value — like choosing between "Ms." and "Mr." — use two steps:
Step A — Insert the field as a regular user-defined field
First, insert customer.gender anywhere in the document
as a regular user-defined field (Ctrl+F2 → User-Defined).
This registers the field in the template schema so Blocpress knows about it.
You can place it invisibly (e.g. in a hidden area or with white font color)
if you don't want it to appear directly.
Step B — Insert a Conditional Text field
Place the cursor where the salutation should appear, then go to Insert → Field → More Fields… → Functions tab → Conditional Text:
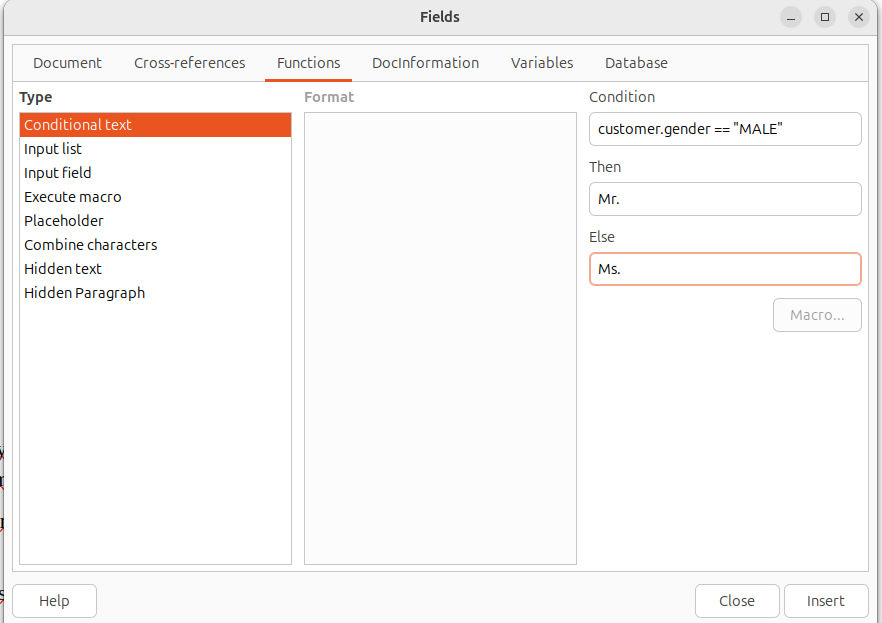
customer.gender == "MALE"Mr.Ms.Upload & validate the template
Open http://localhost:8080 in your browser
(the Studio started in step 0) and click
"Upload template" in the top right. Select
letter_blocpress.odt.
Validation automatically checks:
- All field names are valid JSON paths
- Conditions in section names are syntactically correct
- Repeat groups are properly structured
- A JSON schema is generated covering all fields
Errors are listed with the field name and a description. Warnings can be individually suppressed if they are intentional.
Add test data
Switch to the "Test data" tab in the Workbench. Click "Create test dataset" — the Workbench automatically suggests values based on the template's JSON schema.
Create one dataset per relevant scenario:
customer.gender = "FEMALE" — verifies the
"Dear Ms." greeting section is shown
customer.gender = "MALE" — verifies the
"Dear Mr." greeting section is shown
Typical values, all fields filled — the go-to dataset for a quick sanity check
Very long first/last name — useful to catch line-break or page-overflow issues
Preview & regression test
Click "Preview" next to a test dataset. The Workbench renders the template and displays the generated PDF directly in the browser. Check that the greeting, name, and address are correct.
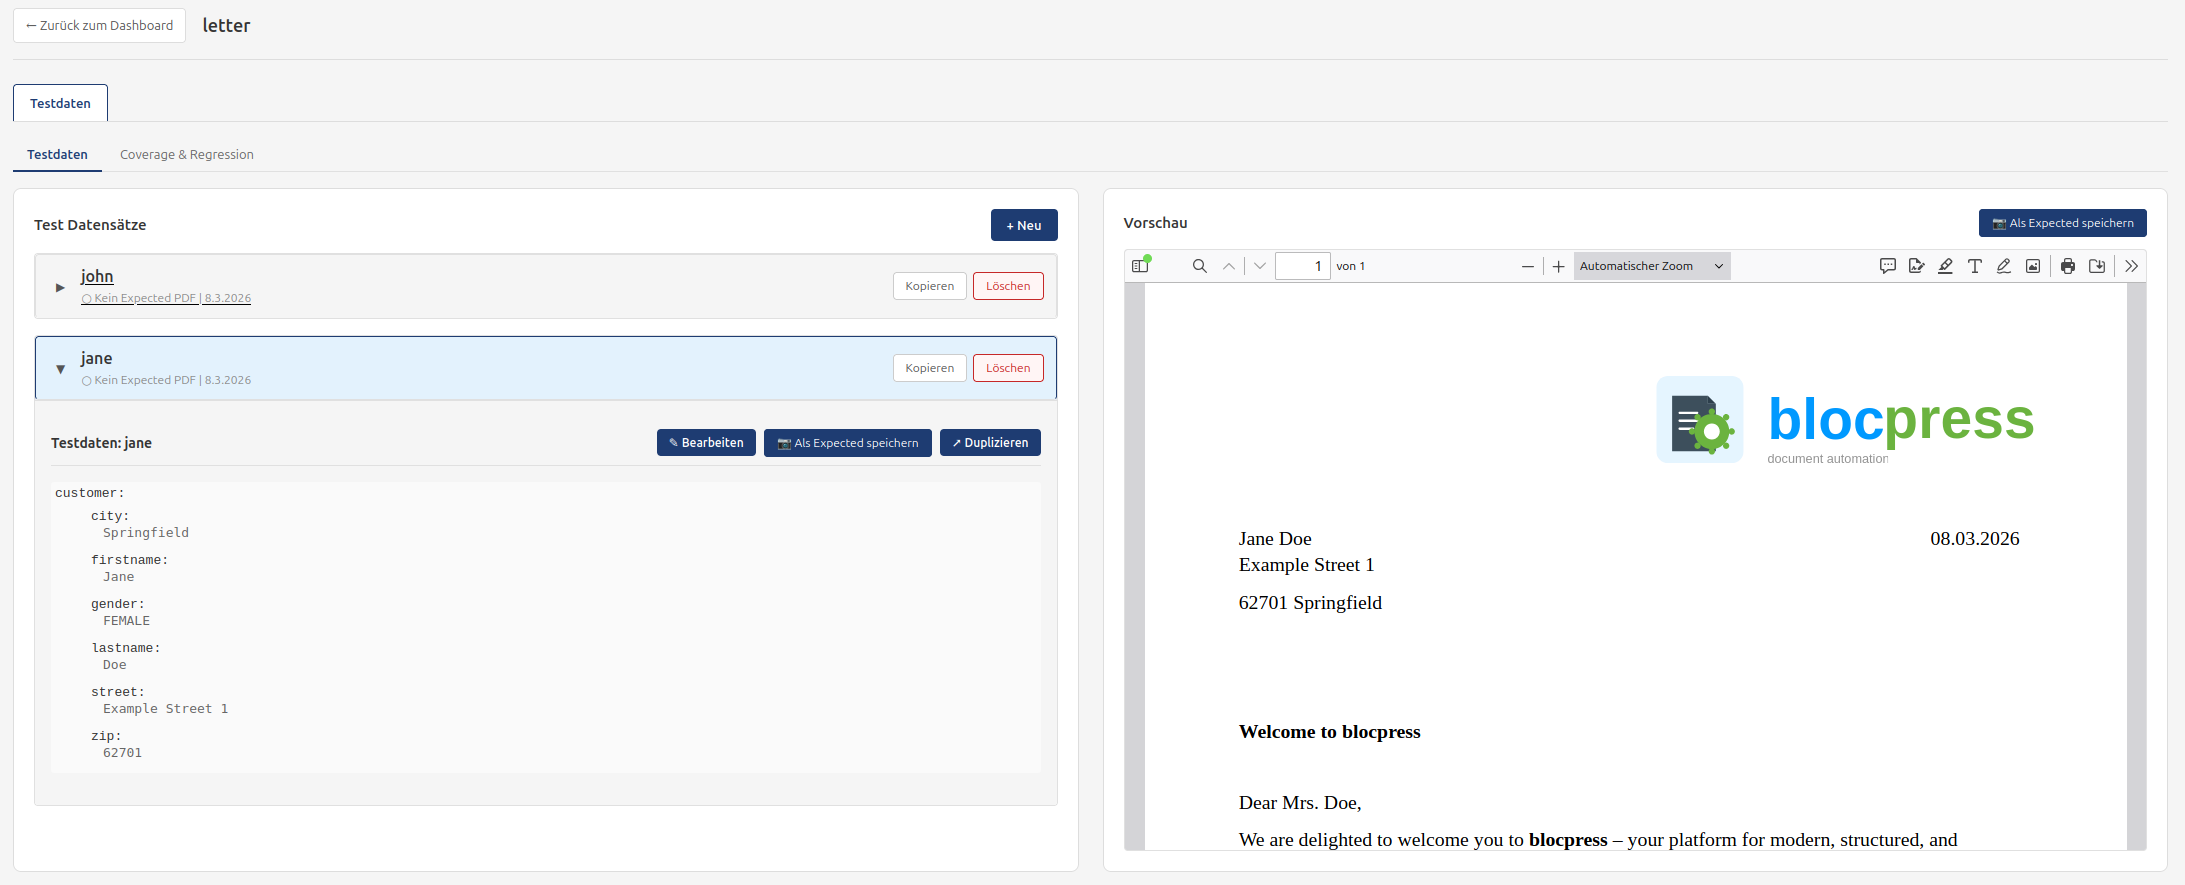
If the PDF looks correct, click "Save as expected PDF". This reference PDF is stored alongside the test dataset. After any future template change, click "Run all" to run the regression test — the Workbench compares every PDF against its saved reference and reports pass or fail.
tutorial-regression-test.png
Submit for approval
When you are satisfied with the template and all regression tests pass,
click "Submit for approval" in the template dashboard.
The status changes from DRAFT to SUBMITTED.
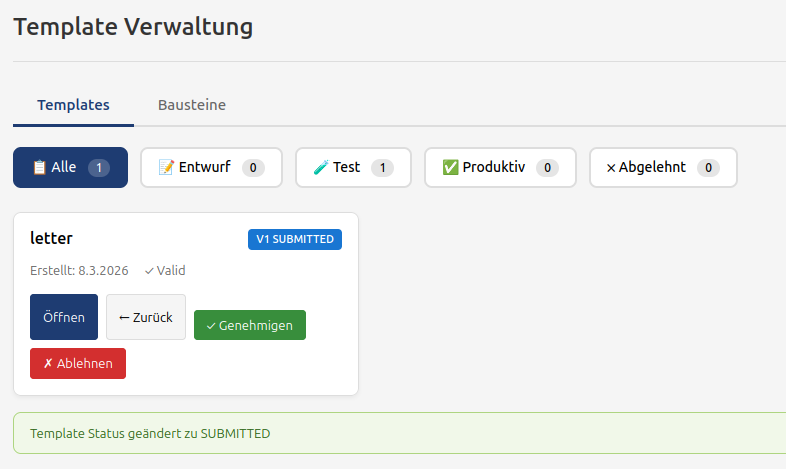
The reviewer checks the template and either:
- Approves (APPROVED): The template is automatically deployed
to production and immediately available via
POST /api/render/letter. - Rejects (→ DRAFT): You receive a rejection reason and can correct the template.
validFrom).
✅ Summary
- Start Blocpress Studio:
docker run flaechsig/blocpress-studio:latest - Create an ODT document in LibreOffice and save it as
.odt - Insert user-defined fields with dot notation (Ctrl+F2)
- Upload the template to the Workbench and fix any validation errors
- Create test datasets for all relevant scenarios (female/male greeting)
- Save PDFs as expected results and run regression tests
- Submit the template for approval — it deploys automatically
Further resources
Full reference: all field types, condition operators, repeat groups, shared text blocks
Read READMEWelcome letter and invoice as downloads — ready to test with the Render API
View samplesInteractive API documentation — available in the running
Studio at /q/swagger-ui
Deploy Blocpress for your team: Docker Compose, PostgreSQL, JWT, reverse proxy
Open tutorial